Today I was putting some tools in the file cabinet and lo and behold I found a sketchbook from 1986. And in it I found a drawing my daughter did when she was 4 1/2 that I can use for my first stuffy. Next to it she drew a house and that will make a great stuffy as well. I want to surprise her so I won't show you just yet what it looks like. She has a birthday coming up in May so hopefully I'll have it ready by then.
There were also some belly dancers that she drew when she was 8. For such a young age, she has an amazing amount of detail in there. One is of a dancer on a rug doing a sword dance with an audience all around her and stage lights above. I didn't even know my daughter was that interested in belly dancing when she was 8, but her 3 drawings of belly dancers say otherwise.
So parents, let your kids catch you drawing and I just bet they'll want to draw too. Now my daughter is about to turn 30 and she has a degree in art and design from Cal Poly San Luis Obispo, CA.

"Funny Little Bunny With a Hole in His Shoe...Skip to my Lou my Darling." Children's crafts & family activities. © 2012 Fayme Harper
Friday, March 9, 2012
Thursday, March 8, 2012
Did You Have A Childhood Icon?
I remember an image I drew over and over again as a child. It was a princess. She varied but always had a tiny waist, a giant poofy gown (like Glenda on the Wizard of Oz), cap sleeves, hair that flipped outward, and a crown. I think I've always been disappointed that I grew up without a tiny waist. I'll try to draw her again to show you what she looked like. Or course it will never again look like a little kid drew it, but at least you can get the idea. My mom had five kids and I don't think she kept things like that and if she did I'm sure they are long gone now that she's passed on.
What did you draw over and over again when you were a child?

What did you draw over and over again when you were a child?

New Softies
I have a new idea for softies based on kid's drawings. Now I just have to scare up some drawings by kids, so I've asked my grown up kids to see if my grandsons and niece might have some laying around. If they come out I might be selling some in the future. We'll see if I have the patience for it.
Monday, March 5, 2012
Wand Tutorial is a Hit
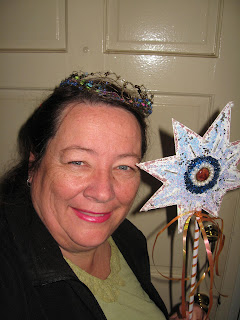
I'm happy my wand tutorial already has 8 likes and one comment. It makes me feel useful and loved. Spring is almost here, so if you make one you can take it outdoors to enjoy the sparkles. It would be a great photo prop or for a make-believe dress up day at the park. Soon I will make a crown tutorial. I have one made out of craft foam and one made out of wire and beads. Which one would you like to see next?
 |
| Crown made of wire and beads. |
Saturday, March 3, 2012
Glitter Star Wand Tutorial
I got a good start on the video wand tutorial. Things are drying out on the porch. If life doesn't get in the way, I should have the video done today. In the meantime, I made a written tutorial for you.
 Supply List:
Light and Medium Weight scrap cardboard
Glitter or sequins or confetti or a mixture
Dowel (1/4" or whatever size makes your hand happy)
Spray paint (gold, silver or white)
White craft glue (thick and thin)
Optional: Hot melt glue/glue gun
Duct tape (small piece)
Small disposable foam brush
Plastic pearls, jewels or beads (use what you have on hand if possible)
Ribbon streamers (re-purposed gift wrap ribbons if you saved them)
Star template or pattern
Disposable glue brush
Clean dry brush
1. Make pattern template out of thin cardboard
2. Draw around pattern on thicker cardboard, label and save pattern for future use.
3. Cut out star. Spray paint one side of star and dowel the color of your choice. Let dry.
4. Cut dowel to the length you want. Set aside.
5. Put a square foot piece of paper creased down the center on your work space. Lay your star painted side up on the paper. Glue bigger elements onto the star in a pleasing pattern with the thicker craft glue. If you need to, draw placement lines with a pencil. The glitter will cover the lines anyway.
6. Using a cheap disposable brush, spread out the thin glue wherever you want the first color of glitter/confetti/sequins. Generously apply glitter. DO NOT PICK UP STAR or all your pretties will slide around.If you get glitter where you don't want it carefully remove it with a clean dry paintbrush.
 7. Let dry for about an hour.
8. Tilt and gently tap star and let excess glitter fall onto paper under the star. This glitter will later be used on the back, so leave it where it is for now. Lay the star back down and dab glue in the spots that you might have missed and touch it up. Put down more glue and add next color/s of glitter and sequins and confetti. Let dry an hour and tap again to remove the excess. Touch up blank spots.
9. Let dry completely in a warm spot.
10. Flip star over. Duct tape the dowel to the back between two points. Now take the spray paint and paint the back of the star and the tape. When that is good and dry, brush the back with glue. You can use a bigger foam brush if you prefer. Glue the left over glitter all over the back.Add more glitter if needed. Once dry, tap off excess glitter, and use it to touch up empty areas. Let dry completely and then tie the ribbons around the stick at the base of the star. Pat yourself on the back.

Light and Medium Weight scrap cardboard
Glitter or sequins or confetti or a mixture
Dowel (1/4" or whatever size makes your hand happy)
Spray paint (gold, silver or white)
White craft glue (thick and thin)
Optional: Hot melt glue/glue gun
Duct tape (small piece)
Small disposable foam brush
Plastic pearls, jewels or beads (use what you have on hand if possible)
Ribbon streamers (re-purposed gift wrap ribbons if you saved them)
Star template or pattern
Disposable glue brush
Clean dry brush
1. Make pattern template out of thin cardboard
2. Draw around pattern on thicker cardboard, label and save pattern for future use.
3. Cut out star. Spray paint one side of star and dowel the color of your choice. Let dry.
4. Cut dowel to the length you want. Set aside.
5. Put a square foot piece of paper creased down the center on your work space. Lay your star painted side up on the paper. Glue bigger elements onto the star in a pleasing pattern with the thicker craft glue. If you need to, draw placement lines with a pencil. The glitter will cover the lines anyway.
6. Using a cheap disposable brush, spread out the thin glue wherever you want the first color of glitter/confetti/sequins. Generously apply glitter. DO NOT PICK UP STAR or all your pretties will slide around.If you get glitter where you don't want it carefully remove it with a clean dry paintbrush.

8. Tilt and gently tap star and let excess glitter fall onto paper under the star. This glitter will later be used on the back, so leave it where it is for now. Lay the star back down and dab glue in the spots that you might have missed and touch it up. Put down more glue and add next color/s of glitter and sequins and confetti. Let dry an hour and tap again to remove the excess. Touch up blank spots.
9. Let dry completely in a warm spot.
10. Flip star over. Duct tape the dowel to the back between two points. Now take the spray paint and paint the back of the star and the tape. When that is good and dry, brush the back with glue. You can use a bigger foam brush if you prefer. Glue the left over glitter all over the back.Add more glitter if needed. Once dry, tap off excess glitter, and use it to touch up empty areas. Let dry completely and then tie the ribbons around the stick at the base of the star. Pat yourself on the back.

Tutorial for the Glitter Wand
Friday, March 2, 2012
Magic Wands
Do you love to play dress up? My next tutorial is going to be on making magic wands to go with your castle adventures and tea parties. We will be using a cereal box and keeping it out of the land fill, so save your next empty box. Also collect some glitter and jewels for it.
 WRITTEN TUTORIAL

Subscribe to:
Comments (Atom)